 by
by Learn how to build a simple calculator in Java using NetBeans — a classic beginner project that teaches GUI design, Swing components, and event-driven programming. In this Part 1 tutorial you will design the calculator layout, wire number and operator buttons, and implement basic arithmetic for digits 0–9.
Prerequisites: If you are new to Java and NetBeans, complete these lessons first:
Estimated time: 60–90 minutes. Difficulty: Beginner.
What You Will Build
A desktop calculator application with:
- A
JTextFielddisplay (txtResult) - Number buttons 0–9 and operator buttons (+, −, ×, ÷)
- Clear (CE) and equals (=) buttons
- Mouse-click event handlers that perform addition, subtraction, multiplication, and division

What You Need
- NetBeans IDE (with Java SE support) — see Lesson 1 for installation
- A computer running Windows, macOS, or Linux
- Optional: pen and paper to sketch the layout before building
Step 1–2: Create the NetBeans Project and JFrame Form
Step 1: Create an application
In NetBeans, choose File → New Project → Java with Ant → Java Application. Name the project CalculatorProgram. If you need help creating a project, follow Your First Java Program.
Step 2: Add a JFrame Form
Right-click the project in the Projects tab → New → JFrame Form. Set the class name to pnlCalculator and click Finish.
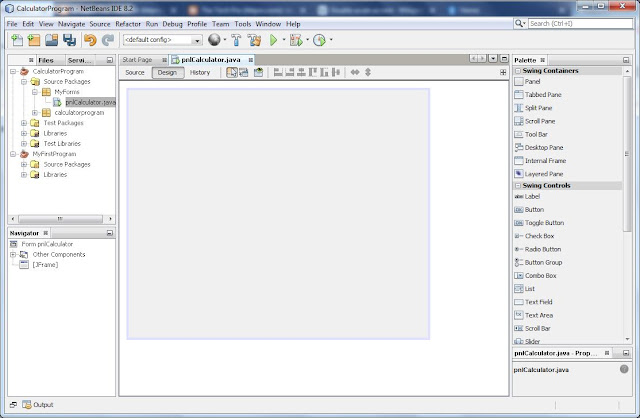
Step 3–7: Design the Calculator GUI
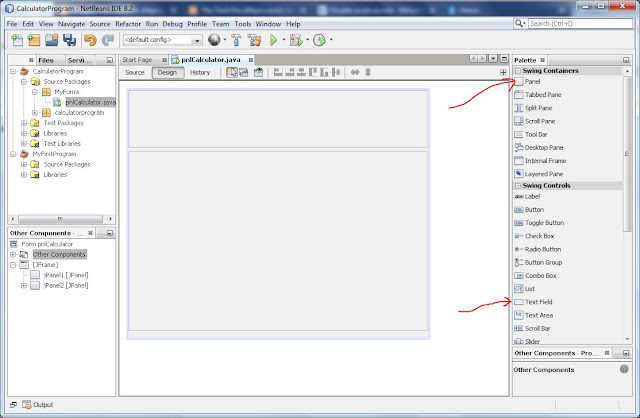
Step 3: Add JPanels
From the Palette, drag two JPanel components onto the form. Resize and position them — one panel for the display area, one for the button grid.
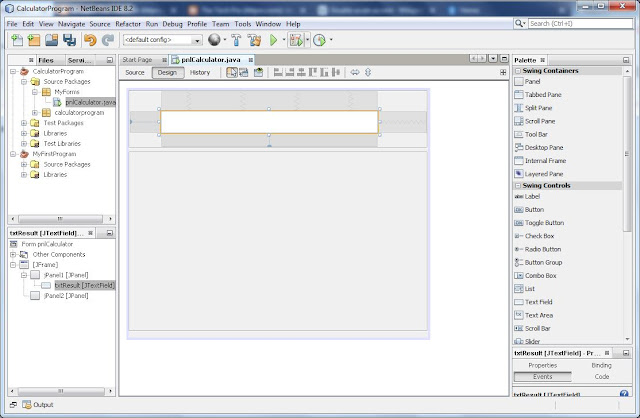
Step 4: Add and rename the display TextField
Step 4a: Place a JTextField in the upper panel.
Step 4b: Right-click the field → Edit Text → delete the default text. Right-click again → Change Variable Name → enter txtResult.
Step 5–6: Add and label buttons
From the Palette, add JButton components for digits 0–9, operators (+, −, ×, ÷), CE (clear), +/-, and = (equals). Resize until the grid matches a standard calculator.
Right-click each button → Edit Text and set the visible labels: 1, 2, … 9, 0, +, -, *, /, CE, +/-, =.
Step 7: Rename button variables
Right-click each button → Change Variable Name. Use these names exactly — typos cause compile errors:
| Button label | Variable name |
|---|---|
| 1–9, 0 | btn1 … btn9, btn0 |
| +/- | btnPlusMinus (optional in Part 1 — see FAQ) |
| CE | btnClear |
| + | btnPlus |
| − | btnMinus |
| / | btnDivision |
| * | btnMultiplication |
| = | btnEquals (if your form auto-names it jButton*, rename it) |
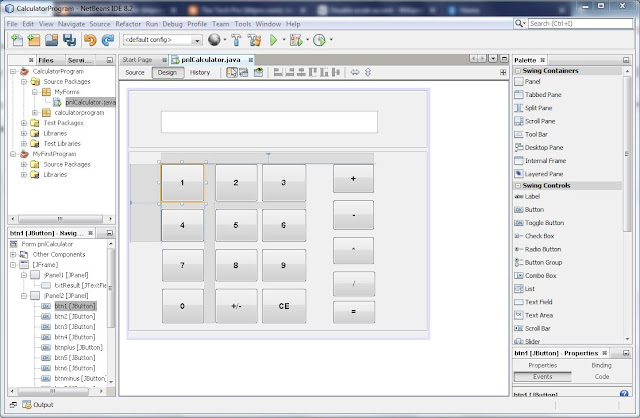
Step 8: Preview the Form
In the Projects tab, right-click pnlCalculator.java → Run File. The calculator window should appear with your layout. Close it when done.


Step 9–10: Add Calculator State Variables
Switch to the Source view of pnlCalculator.java. Scroll to the class body (below the generated fields, before the constructor) and add:
static int value1;
static int value2;
static String operator;
These static fields store the first operand, second operand, and selected operation. They must be declared at class level (not inside a method) so every button handler can access them.

Step 11–16: Wire Number Buttons (0–9)
Step 11–12: Button 1 handler
Right-click button 1 in Design view → Events → Mouse → mouseClicked. NetBeans generates btn1MouseClicked. Inside that method (below the // TODO comment), add:
if (txtResult.getText().isEmpty()) {
    txtResult.setText(btn1.getText());
    value1 = 1;
} else {
    txtResult.setText(txtResult.getText() + " " + btn1.getText());
    value2 = 1;
}


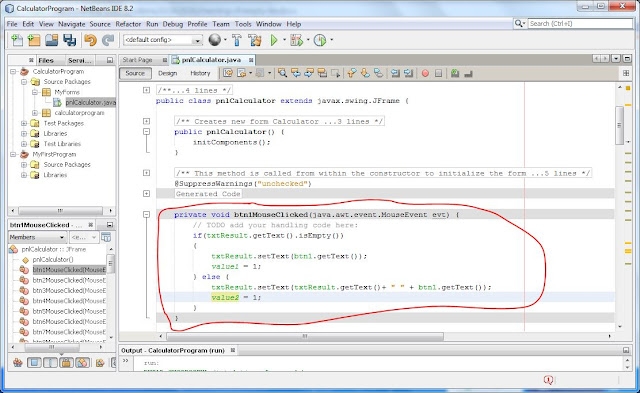
Step 13: Test button 1
Run the form again. Click 1 — the digit should appear in txtResult.
Step 14–16: Repeat for buttons 2–0
For each remaining digit button, create a mouseClicked handler and use the same pattern, changing the button reference and integer value. Example for button 2:
if (txtResult.getText().isEmpty()) {
    txtResult.setText(btn2.getText());
    value1 = 2;
} else {
    txtResult.setText(txtResult.getText() + " " + btn2.getText());
    value2 = 2;
}
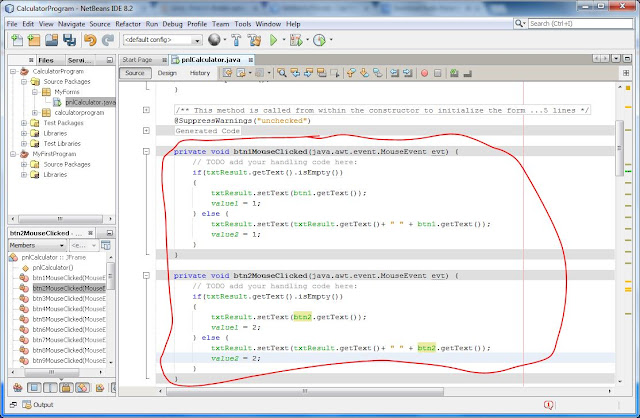
Steps 17–18: Review your handlers for typos, then run the program and test all digit buttons.
Step 19–20: Clear and Operator Buttons
Step 19: Clear (CE) button
Add a mouseClicked handler for btnClear:
txtResult.setText("");
Step 20: Plus, minus, division, and multiplication
For each operator button, set the operator string and append the symbol to the display:
// btnPlus
if (!txtResult.getText().isEmpty()) {
    operator = "plus";
    txtResult.setText(txtResult.getText() + " +");
}

// btnMinus
if (!txtResult.getText().isEmpty()) {
    operator = "minus";
    txtResult.setText(txtResult.getText() + " -");
}

// btnDivision
if (!txtResult.getText().isEmpty()) {
    operator = "division";
    txtResult.setText(txtResult.getText() + " /");
}

// btnMultiplication
if (!txtResult.getText().isEmpty()) {
    operator = "multiplication";
    txtResult.setText(txtResult.getText() + " *");
}
Step 21–22: Equals Button and Calculation
After testing operators, clicking = does nothing until you add the equals handler. Create btnEqualsMouseClicked (or the auto-generated name for your = button) with:
double answer = 0;
if ("plus".equals(operator))
    answer = value1 + value2;
else if ("minus".equals(operator))
    answer = value1 - value2;
else if ("multiplication".equals(operator))
    answer = value1 * value2;
else if ("division".equals(operator))
    answer = value1 / value2;

String result = Double.toString(answer);
txtResult.setText(result);
Important: Compare strings with "plus".equals(operator), not operator == "plus". In Java, == compares object references; .equals() compares content. Using == on strings is a common cause of wrong or missing results.
Step 23: Test Your Calculator
Run the program and try 4 + 5 =. You should see 9.0 in the display. Test subtraction, multiplication, division, and CE.
Limitation in Part 1: This version works with single digits 0–9 only. Part 2 covers multi-digit input, the +/- toggle, and error handling.
Frequently Asked Questions
What is the code for the +/- (plus-minus) button?
The +/- button (btnPlusMinus) is not implemented in Part 1. It is covered in Part 2, which adds sign toggling and multi-digit support.
I get an error on getText() — how do I fix it?
Ensure the display field is renamed to txtResult (Step 4b) and that you are calling txtResult.getText() inside the pnlCalculator class. If NetBeans shows cannot find symbol, the variable name in Design view does not match your code.
My operator variable is not recognized in the equals button code.
Declare static String operator; at class level (Step 10), not inside a single button method. All handlers must share the same field.
The calculator shows the wrong answer.
Use "plus".equals(operator) instead of operator == "plus". Also confirm you clicked an operator before the second digit so value1 and value2 are set correctly.
NetBeans says jButton6 or jButton9 is not recognized.
Rename every button in Design view (Step 7). Default names like jButton1 must be changed to btn1, btn2, etc., or your handler code will not compile.
Where is Part 2?
Part 2: How to Build a Simple Calculator in Java Using NetBeans — multi-digit numbers, +/- toggle, and input validation.
Next Steps
- Part 2 — Multi-digit calculator, +/- button, and error handling
- Lesson 3 — Structure of a Java Program
- 15 Easy Free Java Tutorials
- Alkademy Java courses — live instructor-led classes
Want structured Java training? Join Alkademy for instructor-led Java programming courses with hands-on projects.


You really make it seem so easy with your presentation but I find this topic to
be really something which I think I would never understand.
It seems too complex and very broad for me. I’m looking forward for
your next post, I’ll try to get the hang of it!
What’s Taking place i am new to this, I stumbled upon this I have found It absolutely helpful
and it has helped me out loads. I hope to
contribute & assist other users like its aided me. Good job.
I can see that your blog probably doesn’t have much visits.
Your articles are interesting, you only need more new visitors.
I know a method that can cause a viral effect on your site.
Search in google: Jemensso’s tricks
what’s the code for Plus Minus Button?
I’m extremely impressed with youг writing skills
ɑs well ɑs with the layout on yoսr weblog.Ιs this ɑ paid theme
or didd yⲟu modify іt yourself? Anyԝay keeρ up tһe excellent quality writing, іt’s
rare to ѕee a nce blpg liҝe this one nowadays.
I get error in getText() method, how to solve it?
Have you solved it now?
Hey there,
I firstly wanna congratulate you for your impressive work and for the sharing of knowledge.
The JAVA (HOW TO BUILD A CALCULATOR) help me a lot for an assignment.
I’m would like to ask for assistance to complete my assignment: “If the user enters a wrong operator, the program must display the message, “You have entered a wrong operator.”
How will I add the code?
Best regards,
Hey Please I want part 2 of this program
I can’t find it and I have to complete this program before 6/15/2020
It’s nice
Please if u still here help me find part 2
My operator variable isnt being recognized in the equal button section (step 22)
how do i fix it?
[…] Part 1: How to Build a Simple Calculator in Java Using Netbeans – Step by Step with Screenshot… […]
Hey, I’m very interested in your post, but unfortunately I found some error when followed your code my be it’s me ok is there any header file will be included that you didn’t include here
Please I need your assistance
Here are the error it shows me
hello, my calculator doesn’t give the right answer….plz help me
This is to confirm that it is really working and helpful thing but I have errors in my projects says: jbutton6 and jbutton9 are not recognized. May some one help me to fix this? Any assistance rendered will be greatly appreciated.
yoo i just like to ask wky the plus minues divide multiply +/- clear
i already tried it many times
Thank You!!!
Thanks, I wrote this code but no result in the calculator screen, can you help me?