
 by
by In this tutorial, you will learn how to configure a failover cluster in Microsoft SQL Server 2019. We would cover the following topics
- Initial Network Setup
- Install SQL Failover Cluster on Node1
- Add Node2 to the Cluster
- Verify the Cluster is Working
1. Initial Network Setup
Creating Failover Cluster in SQL Server is quite clear and straightforward. However, before you can setup an SQL Server Failover cluster, you must have two or more computers on the network. In this demo, I’m using three computer:
- SQLSERVER1 – first node of the cluster
- SQLSERVER2 – second node of the cluster
- SQLSERVER3 – storage node, contains iSCSI virtual disks
See How to Setup a Domain Network
2. Install Failover Cluster on SQLSERVER1
You have to first install SQL Failover Cluster on one of the nodes. Follow the steps below to do that:
Step 1 – Run the SQL Server Setup and choose ‘New SQL Server Failover Cluster installation’ as shown below

Step 2 – Follow the steps until you get to the ‘Install Failover Cluster Rules’, make sure that no test failed as shown below.

Step 3 – Continue on the the next step. In the Feature selection, ensure that Database Engine is selected

Step 4 – In the Instance Configuration, select Named Instance and give it a name. For me I called it SQLCLUSTER

Step 5 – You may receive the error below
“the given network name is unusable….due to the following error: The network address is invalid”
To correct this error, just uninstall VirtualBox Guest Additions and restart
Step 6 – At the cluster resource group as shown below, click next

Step 7 – In the Cluster Disk Selection, select all the available storage as shown below

Step 8 – In Cluster Network Selection, select Ipv4 and DHCP

Step 9 – Specify the user account for the Agent and Database Engine

Step 10 – Add the server administrators

Step 11 – Follow the step and complete the installation
The final window is shown below

3. Add Node to the Cluster
Since we have successfully set up failover cluster from the first Node(SQLSERVER1), we would now go to the second node (SQLSERVER2) so we can add the the node to the cluster. Follows the steps below
Step 1 – Launch the SQL Server Setup and choose ‘Add Node to SQL Server Failover Cluster”

Step 2 – You can see from the figure below the it detect the cluster we created in the first node (SQLCLUSTER01)

Step 3 – Follow the steps to complete the installation as shown below

4. Check that the Cluster Works Fine
Let’s now check that our failover cluster is working correctly.
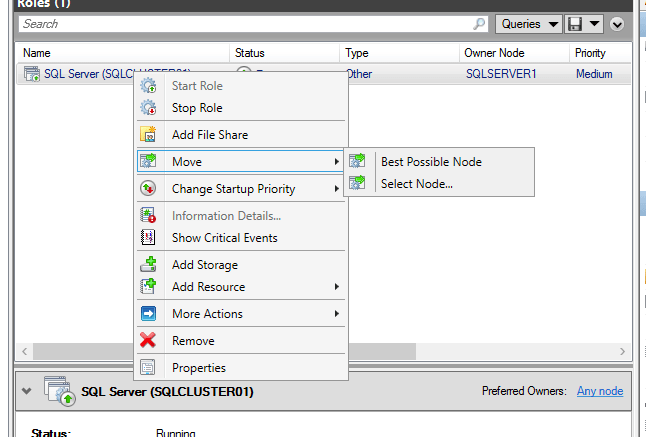
Step 1 – Open Failover Cluster Manger in Node1 (where we installed the cluster). Click on Roles and you will see that the SQL Failover cluster is running as shown below

A little explanation
Now you see the the cluster is running on SQLSERVER1. So if a failure occurs, it would be migrated to the second node. So let’s see how this works
Step 3 – Right click on the cluster and choose Move > Best possible node as shown below. The would cause the cluster to switch to the second node.
Step 4 – Verify that the cluster would now be running on the second node (SQLSERVER2)
At this point, you have successfully completed creating and testing SQL Server Failover cluster. I do recommend you watch the video on my YouTube Channel as well. And if you have any challenges, please let me know.
Want live SQL Server and BI classes? Join Alkademy for instructor-led database administration and business intelligence courses.


Thanks to the article, it is the simplest and clearest I found in my research. Imagine we already have a SQL Server 2019 with a database in production, what could we do regarding the data migration?
Many Thanks!