 by
by Learn how to deploy SpringBoot API to Azure with a MySQL database, GitHub Actions CI/CD, Azure App Service, and secure deployment credentials.
TL;DR
-
Deploy SpringBoot API to Azure using Azure App Service and a MySQL database.
-
Create an Azure App Service to host the Spring Boot REST API.
-
Set up Azure MySQL Flexible Server and connect it to the Spring Boot application.
-
Configure GitHub secrets and deployment credentials to securely connect your repository to Azure.
-
Use a GitHub Actions workflow to create a CI/CD pipeline that automatically deploys application changes to Azure.
In this tutorial, I will explain to you how to deploy Spring Boot REST API with MySQL database to MS Azure for free using the free tier. We would also, as a prerequisite have our application pushed to Github. In this way, we would also achieve a CI/CD pipeline.
Prerequisites
- You need to create an account in Azure Portal
- Sign up for the Free Tier plan which provides you with a $200.00 credit in your billing account
We would cover the following:
- Create the Azure App Service
- Create the Azure MySQL Database
- Obtain and Setup the Credentials
- Create and Update the Github Workflow
- Obtain the Workflow Yaml
1. Create the Azure App Service
Sign in to Azure Portal and select App Services.

Click on Create -> Web App
Follow the steps to complete creating you web app (watch the video for the procedure)
2. Create Azure MySQL Database
We would have to create an Azure MySQL database. Then we would copy the database credentials and use it to update our application properties. Follow the procedure below:
- Search for Azure Databases for MySQL Servers
- Click on Create
- Choose Flexible Servers
- Click on Create an fill the required details
- Click on Review and Create and complete the process.
- Once the creation and deployment is complete
- Copy the name of the server and update the database url in the application.properties file in Spring Boot
- Connect to the database using this command
mysql -h productdb2.mysql.database.azure.com -P 3306 -u rootuser -p
Once connected, run the create database command and create the database specified in your application.properties file
3. Obtain and setup the Credentials/Secrets
Open the Azure terminal and run this command:
az ad sp create-for-rbac --name "myApp" --role contributor \
    --scopes /subscriptions/{subscription-id}/resourceGroups/{resource-group} \
    --sdk-auth
Now we have to copy the json generated in Step 2 above to Github.
- From your repo in Github, click on Settings.
- Select Environments from the left.
- Click on the environment
- Click on New Environment secret
- Enter the name as AZURE_CREDENTIALS
- In the value field, paste the secret you copied and then save.
4. Create and Update the Workflow
We would have to create workflow yam file in Github. Follow the steps:
- From Github, click on the Actions tab and select New Workflow
- The click on Set up a workflow yourself link
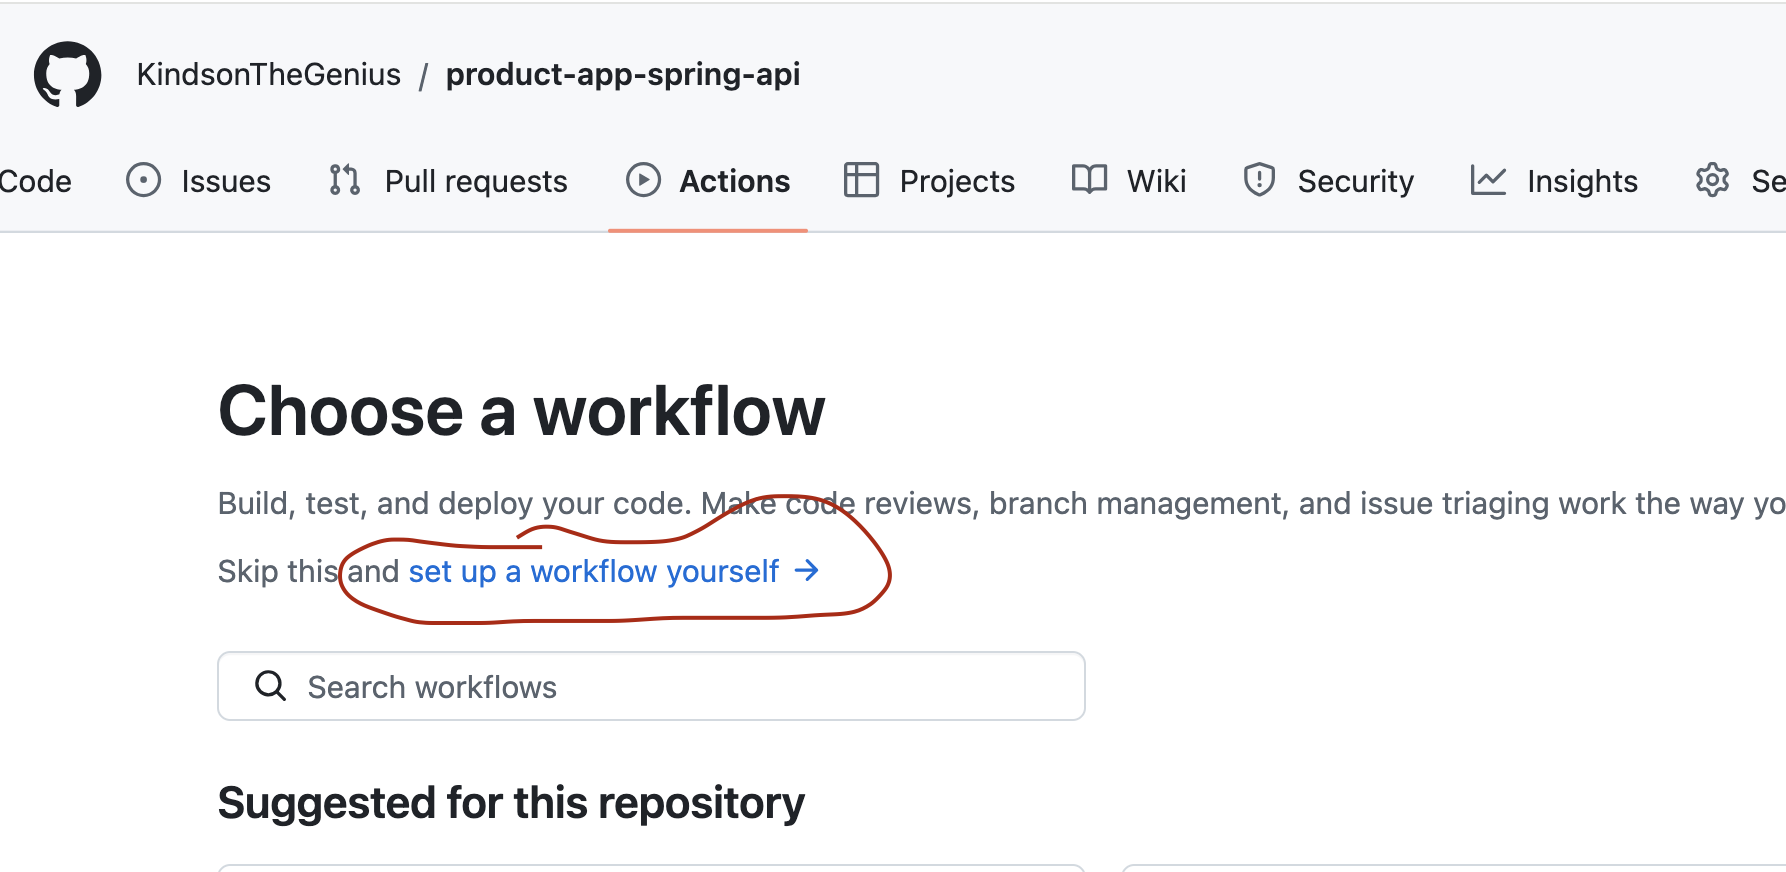
This would open an empty workflow yaml file. You will obtain what you’ll place in this file from Azure.
5. Obtain the Workflow Yaml
Follow the steps below:
Open your web app in Azure portal
Click on Deployments as shown below:

Click on the Deployment Center link
Make the selections as shown below in the figure below:

In the authentication settings, select User-Assigned Identity
Leave the other entries with their default values
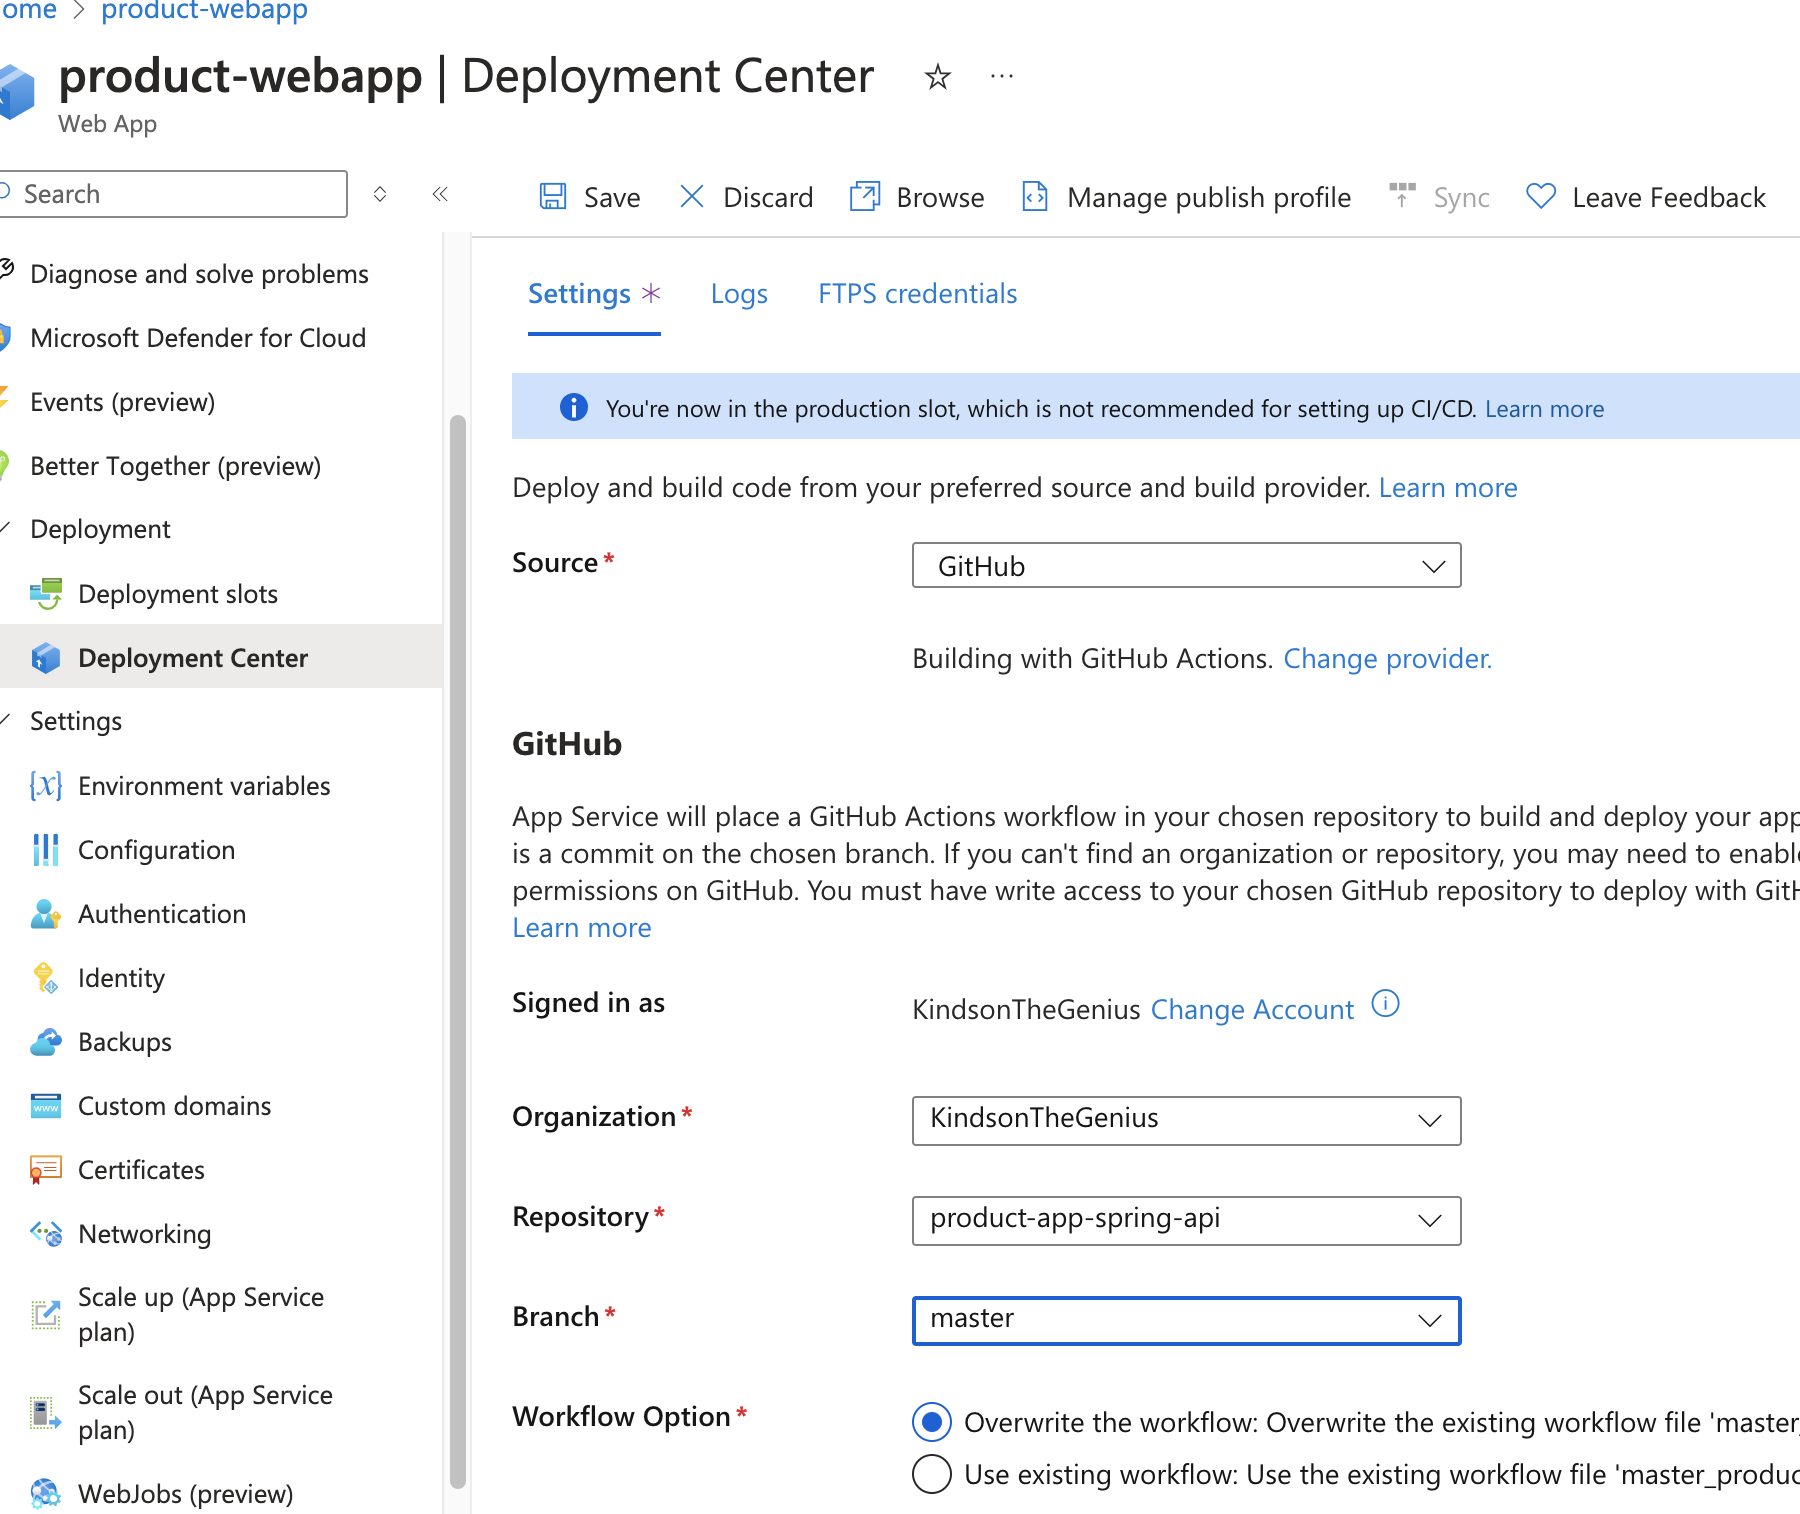
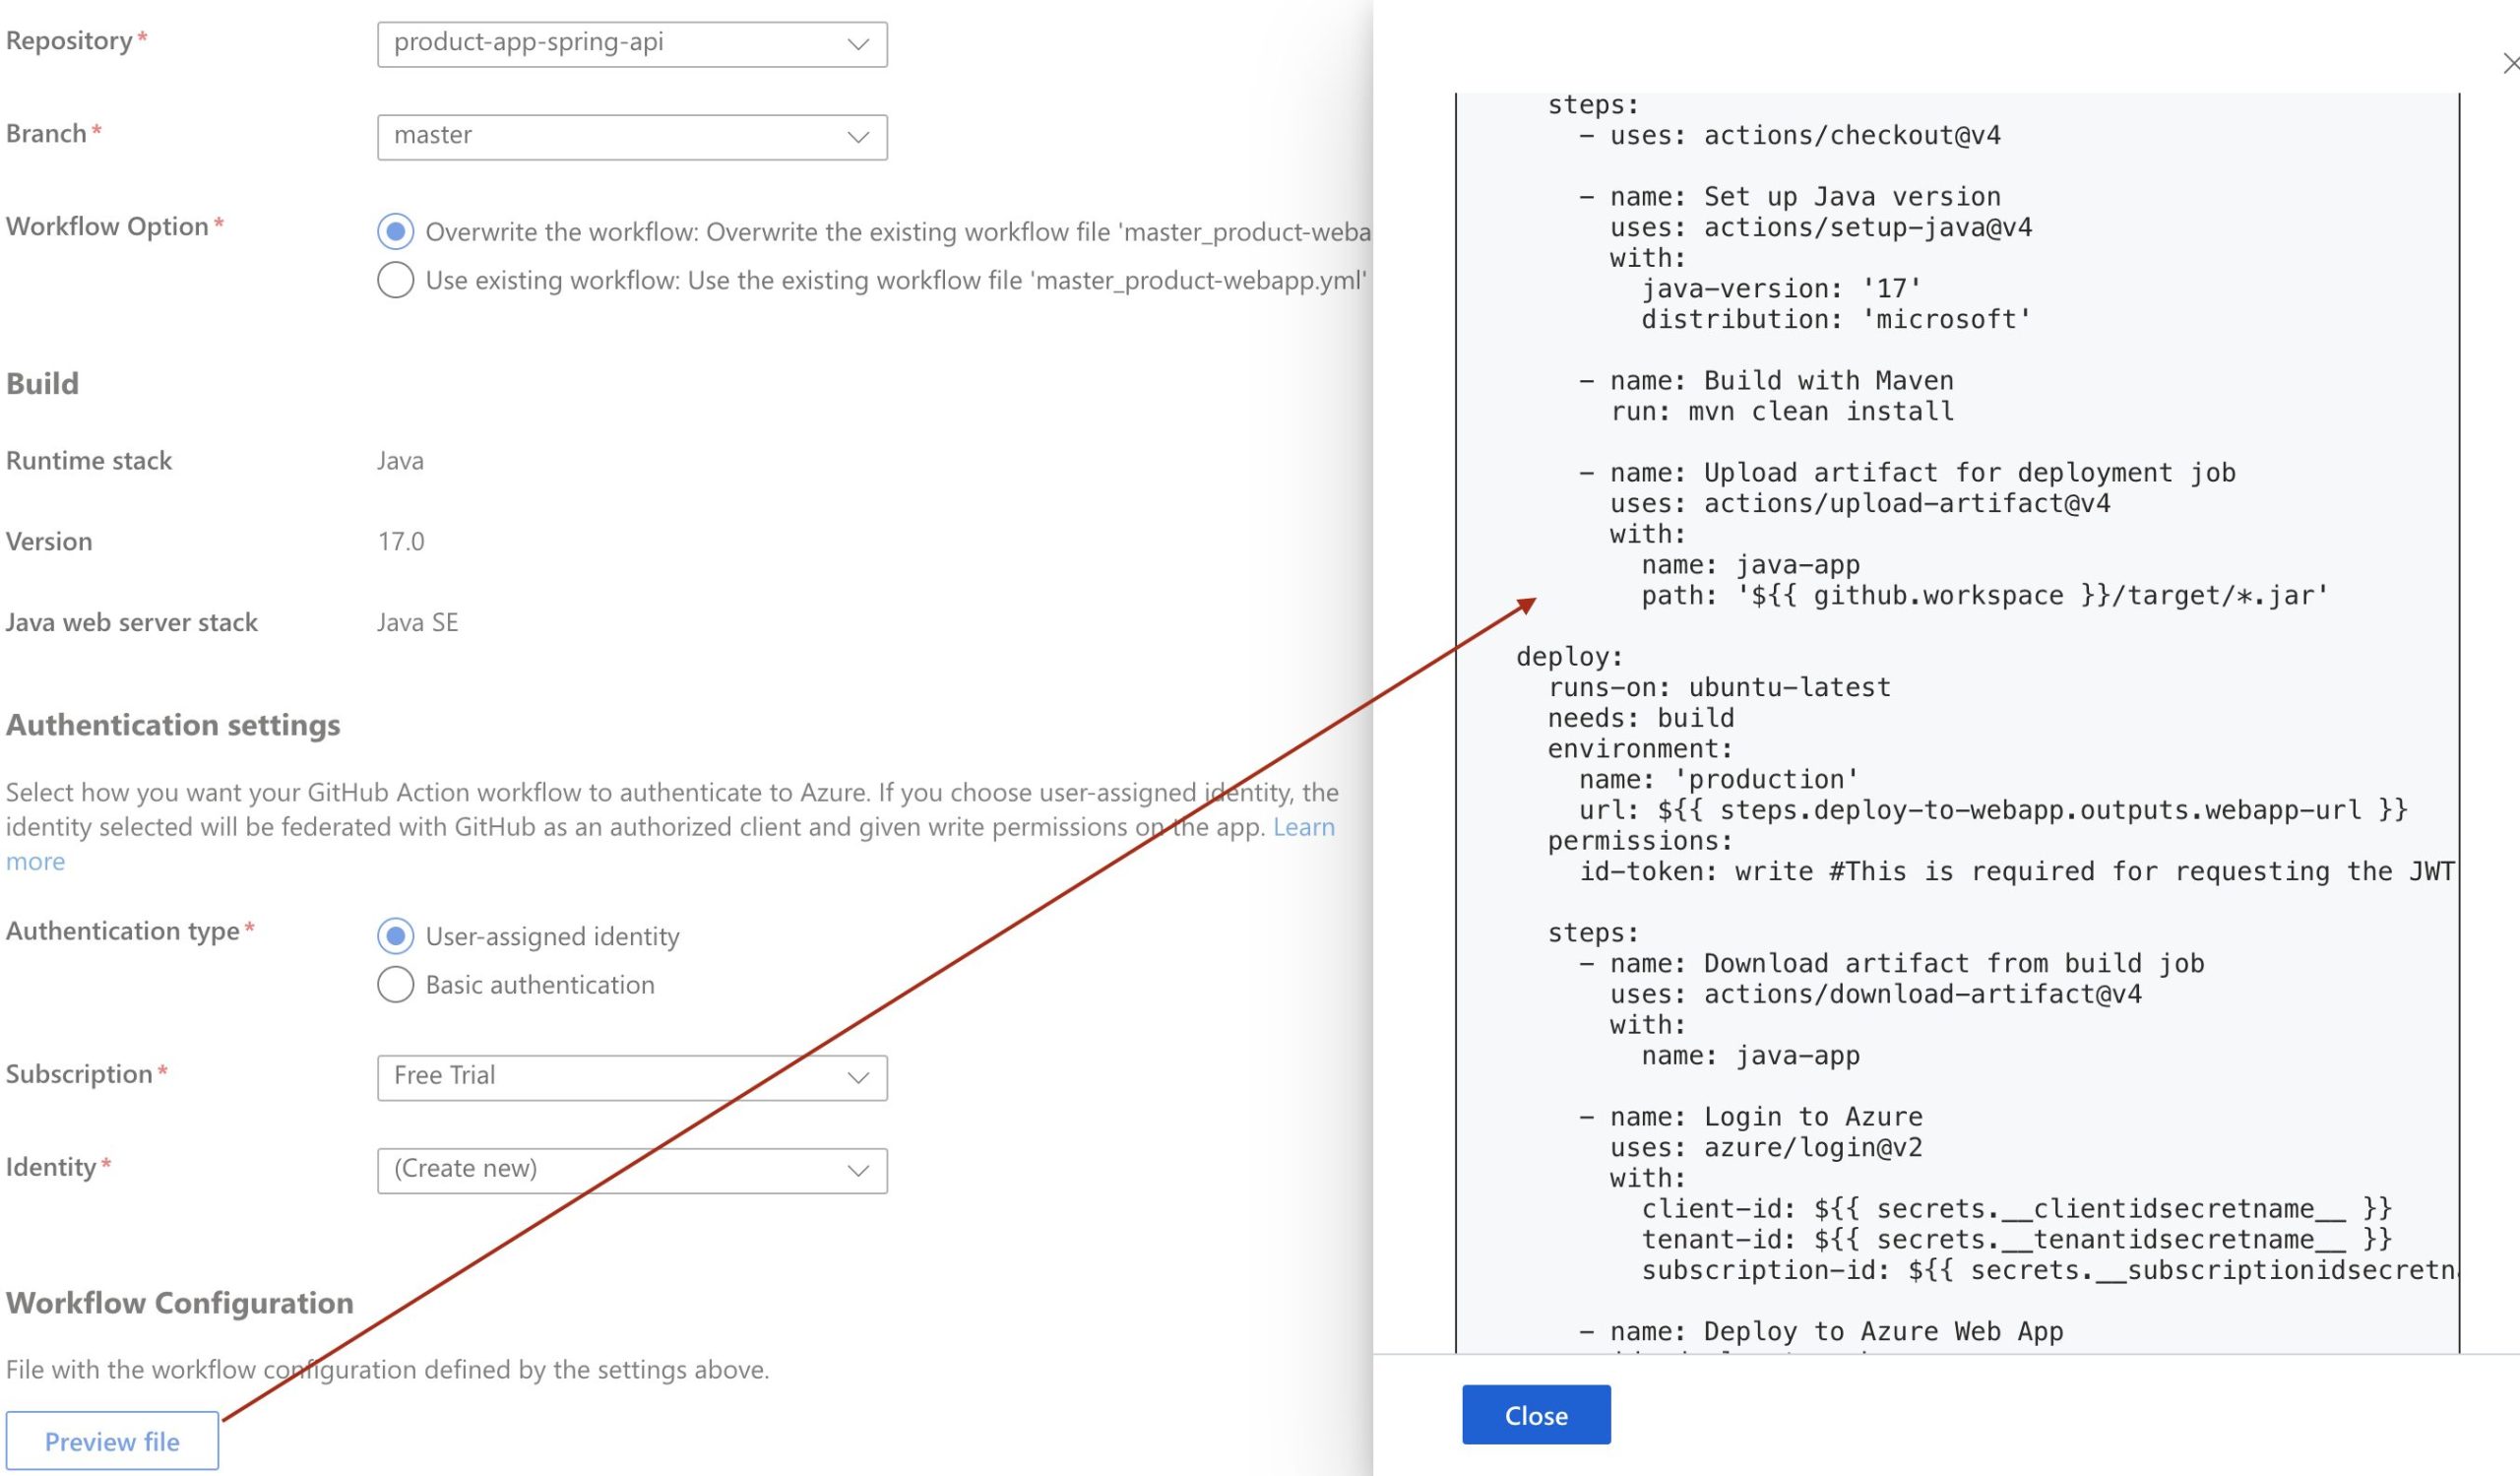
Then click on Preview File.
Copy the the output to the Github workflow file.
Enable Public Access
- Navigate to your app in Azure
- Click on Networking
- Check and make sure it’s Enabled
FAQs
Can I deploy a Spring Boot API to Azure?
Yes. This tutorial uses Azure App Service to host the Spring Boot REST API and Azure MySQL for the application’s database.
What Azure service is used to host the Spring Boot API?
The tutorial uses Azure App Service, which provides a managed environment for hosting the Spring Boot application.
How do I connect Spring Boot to Azure MySQL?
Create an Azure MySQL Flexible Server, obtain its server details and credentials, and update the Spring Boot database configuration with the Azure MySQL connection information.
Can GitHub automatically deploy my Spring Boot application to Azure?
Yes. GitHub Actions can be configured as a CI/CD pipeline so changes pushed to the repository can trigger deployment to Azure App Service.
Where should Azure deployment credentials be stored?
The tutorial stores the Azure credentials as a GitHub environment secret, rather than placing sensitive credentials directly in the workflow file.
Can I use the Azure free tier for this tutorial?
The original tutorial is designed around Azure’s free-tier/free-credit offering. Azure pricing and free-tier eligibility can change, so check the current Azure terms before deploying.
Final Thoughts
Deploying a Spring Boot API to Azure brings together several important cloud and DevOps concepts: managed application hosting, cloud databases, deployment credentials, and CI/CD automation.
The workflow in this tutorial starts with an Azure App Service and MySQL database, connects the application to the database, and then uses GitHub Actions to automate deployment. This gives you more than a hosted API — it provides a foundation for continuously delivering changes from your source repository to Azure.
As you move beyond a basic deployment, the next step is to strengthen the setup with proper secret management, environment-specific configuration, monitoring, database backups, HTTPS, and a more robust CI/CD workflow. The core process remains the same: build, configure, deploy, and automate.
