by
by Learn how to build the InventoryMS Complete Application with React UI, Vite, CoreUI, SpringBoot API integration, authentication, CRUD, routing, and Redux.
Note: this document is live and will continue to be updated while we develop the InventoryMS application
TL;DR
-
InventoryMS Complete Application – React UI uses React, Vite, and CoreUI to build the frontend for an inventory management system.
-
Connect the React UI to the SpringBoot REST API using Axios and display inventory data in tables.
-
Implement user authentication, protected routes, login, and logout across the React application.
-
Build reusable CRUD components with pagination, searching, filtering, dialogs, and image handling.
-
Set up dashboard statistics, application routes, navigation, Redux state management, and deployment for the React application.
This is the second part (Part 2) of our Complete InventoryMS application in React and Spring Boot. In this part (SpringBoot API), we would develop the React UI application.
To help simplify the styling, we would be using the CoreUI template and we would be using the Vite framework.
Content
- What we would in this Tutorial
- Setup the CoreUI Template
- Establish Communication with the Spring REST API
- Setup User Authentication
- Setup CRUD for Various Components
- Add Stats to the Dashboard
- Setup the Routes and Navigation
Here’s a preview of what we want to achieve

1. What we Will Cover in this Tutorial
As we build the UI application for the InventoryMS, we would learn the following concepts:
React routing/Protected Routes – we would learn how to configure routes as well as protected routes which requires authentication to access
Using the Context Hook – this would help us store shared states that we need accross our components
Managing User Authentication – how to handle basic authentication as well as JSON Web Tokens (JWT)
Table Rendering – for data on a table, how do we implement pagination, sorting, filtering and searching
Request Interceptors – with this we can create default configuration that would apply to all requests made from our React application. This include some common headers such as bearer token and user credentials
Working With Images – we would learn how to asynchronously upload images to a remote blob storage while saving the image url in a database record
User Login/Logout – how to manage user login and logout
Hosting React Application – we would first learn how to containerize our React application. Then we proceed to deploy to various cloud platforms including: VPS, AWS and Azure.
State Management Using REDUX – we would see how we can use state management tools to handle shared application states.
2. Setup the Core UI Template
In this part we would set up the CoreUI Free React Admin Template
Visit the Github Repo for the CoreUI template and clone the repository to your local machine.
After cloning, make the changes described in this tutorial to setup the Core UI template (how to setup React template)
After this part, we should be able to start the application and access the index page.
3. Establish Communication With SpringBoot API
In this part we would establish communication with the SpringBoot API, fetch some data and display on a table. We start with the brands table.
Create a React functional component named Brand
Define the state hook for brands with an initial state of empty array
Define a state the represents a single brand
Setup the useEffect hook and using axios, fetch the brands list and update the state using setBrands (you may need to hardcode the credentials in the header for now. We fix this in the next step using Request Interceptor)
Finally, return a table of brands. You can use <TableContainer> component provided by Material UI.
Start the application to make sure you have data displayed on the page
4. Setup User Authentication (Login/Logout)
The procedure for this is outlined here
Authentication video tutorial here
- Create the AuthProvider component
- Create the ProtectedRoute component
- Update the Login component
- Update the Register component
5. Setup the Components for CRUD on Various Objects
In this part, we first update the Brand component to include additional features. This includes: Add, Edit and Delete operations.
- Create the handlers
- Create the dialog components for New/Edit/Details as well as the Delete dialog (how to implement CRUD)
- Implement table pagination on the table (how to implement pagination)
- Implement search/filtering (how to do filtering)
You will first need to install the following dependencies:
    axios
    @mui/icons-material
    @mui/material
    @emotion/styled
Get the initial template from here for the Brand component and use it for this setup. Next do the following:
- add some initial data to the brands table. Get the query here
- create the .env file and add the credentials and base url
- create the axiosConfig.js file
- update the route.js file adding the /brand route for the Brand component
6. Add the Stats to the Dashboard
Implement the stats computation at the SpringBoot API and then display the values on the dashboard.
Example of stats below:
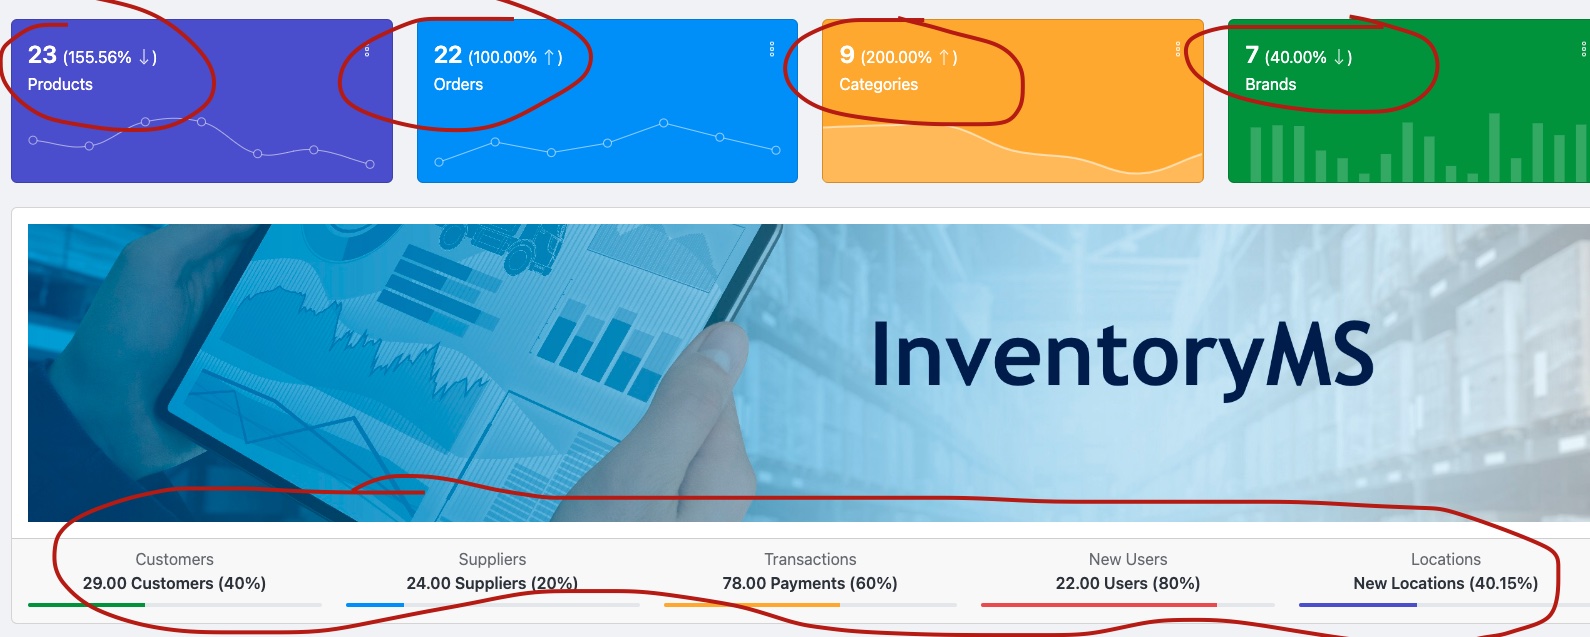
To implement the stats, the following needs to be done:
In the service layer for the model, implement a function that calculates total for current month, total for previous month and the percentage difference
Return this result in the controller layer. See the calculate stats function for order here.
7. Setup the Navigation and Routes and Links
Here we are going to be setting up the navigation for different sections.
First, we would create all the elements we need for the application
Open the routes.js component and create the routes for all the elements
Open the AppHeaderDropdown (components/header/AppHeaderDropdown) component and update the links as needed
Do the same for:
- AppHeader (components/AppHeader)
- _nav (src/_nav) – this controls what display on the sidebar
FAQs
What is the InventoryMS Complete Application – React UI?
It is the React frontend for the InventoryMS application, designed to communicate with the SpringBoot REST API and provide an interface for managing inventory data.
Which technologies are used to build the InventoryMS React UI?
The tutorial uses React, Vite, CoreUI, Axios, Material UI components, and Redux for state management.
How does the React UI communicate with the SpringBoot API?
The React application uses Axios to send requests to the SpringBoot REST API, retrieve data, and display it in components such as inventory tables.
How is authentication handled in the React UI?
The application includes user login and logout, an AuthProvider, ProtectedRoute components, request interceptors, and support for Basic Authentication and JWT.
What CRUD features are covered in the InventoryMS React UI?
The tutorial covers adding, editing, deleting, and viewing records, along with table pagination, searching, filtering, dialogs, and related API operations.
Final Thoughts
The InventoryMS Complete Application – React UI brings together the frontend concepts needed to build a practical inventory management application with React and SpringBoot. Instead of focusing only on individual components, the tutorial connects authentication, API communication, CRUD operations, routing, navigation, dashboard statistics, and state management into one application.
Using React with Vite and CoreUI provides a practical foundation for building the interface, while the SpringBoot API handles the application’s backend functionality. As the application grows, concepts such as protected routes, request interceptors, Redux, image uploads, and deployment become important for keeping the frontend organized and maintainable.
The goal is not just to build an inventory dashboard, but to understand how the different pieces of a modern React and SpringBoot application work together.