 by
by Content
- Review of Tutorials 1 and 2
- Build a New REST API in Visual Studio 2017
- Understanding the Controller File in Web API Application
- Create the Employee Model
- Create the Employee Controller
- Set up the GET methods
- Write the POST method
- Write the PUT and DELETE Methods
- Next Steps
1. Review of Tutorials 1 and 2
In Tutorial 1, we build a REST API in Visual Studio and we created an Employee Model. We also added an EmployeeController and wrote GET methods to return list of employees and another GET method to return an employee based on the ID
In Tutorial 2, we set up a REST Client (Advanced REST Client) and made tested our API.
In this Tutorial, we will create a new REST API and this time we will writh all the methods for GET, POST, PUT and DELETE operations.
2. Build a New REST API in Visual Studio 2017
This time in Visual Studio 2017 (you can download it for free from this link)
Start a new project to display the New Project Wizard as shown in Figure 1
Select Web fromt he list of templates on the left
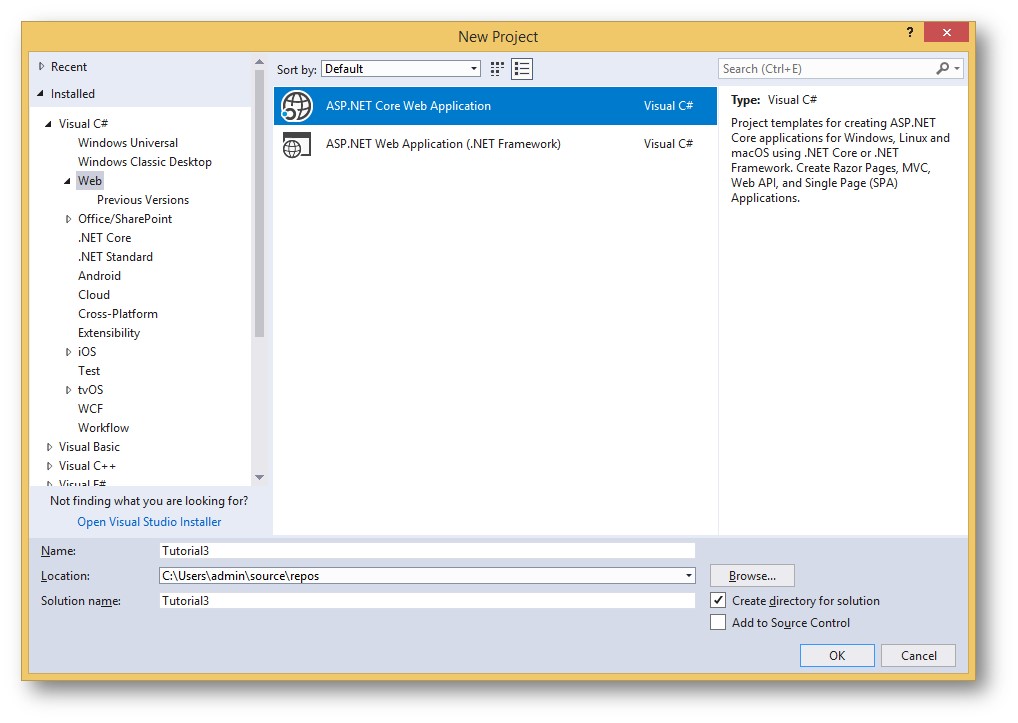
Give the Project a name (here I use Tutorial3)
Select ASP.NET Core Web Application
Click OK. The New AST.NET Core Web Applition templates is displayed as shown in Figure 2
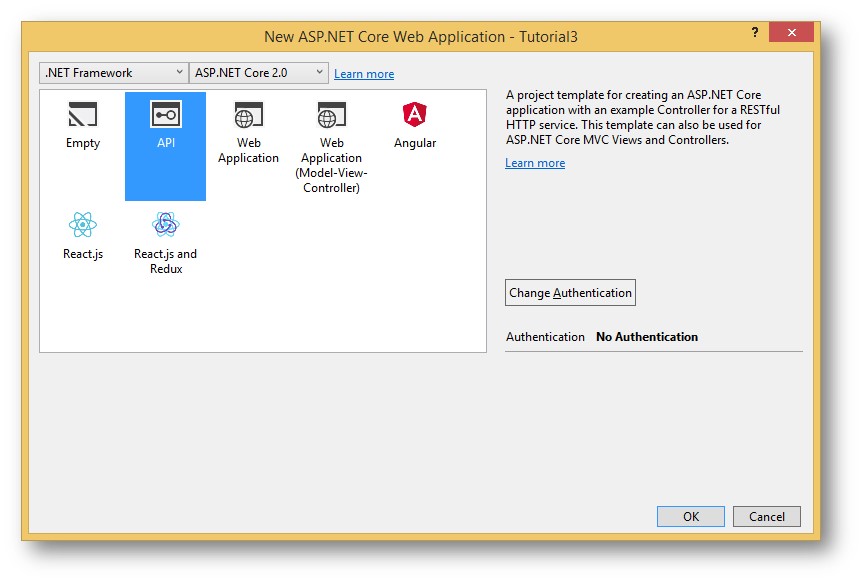
Select .NET Framework in the first box at the upper left if it is not already selecte
Select ASP.NET Core 2.0 (or 1.1 depending on your version of Visual Studio)
Click OK. The API application file and folders are generated for you.
Take a look at the folder structure as shown in Figure 3.
Note that in this case, we no longer have ‘WebAPIConfig.cs’ file
Quiz: Do you remember the configuration we made in teh WebAPIConfig file in Tutorial 1?
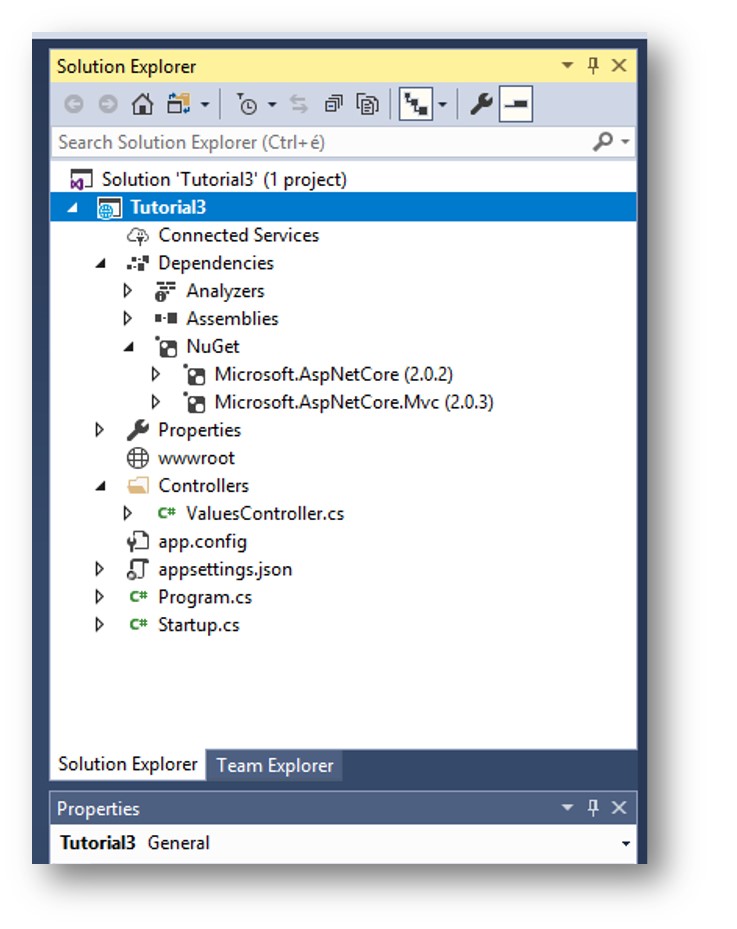
Note that there is a controller called ValuesController in the Controllers folder
Open the ValuesController and examine the content and check that it is as shown in Figure 6
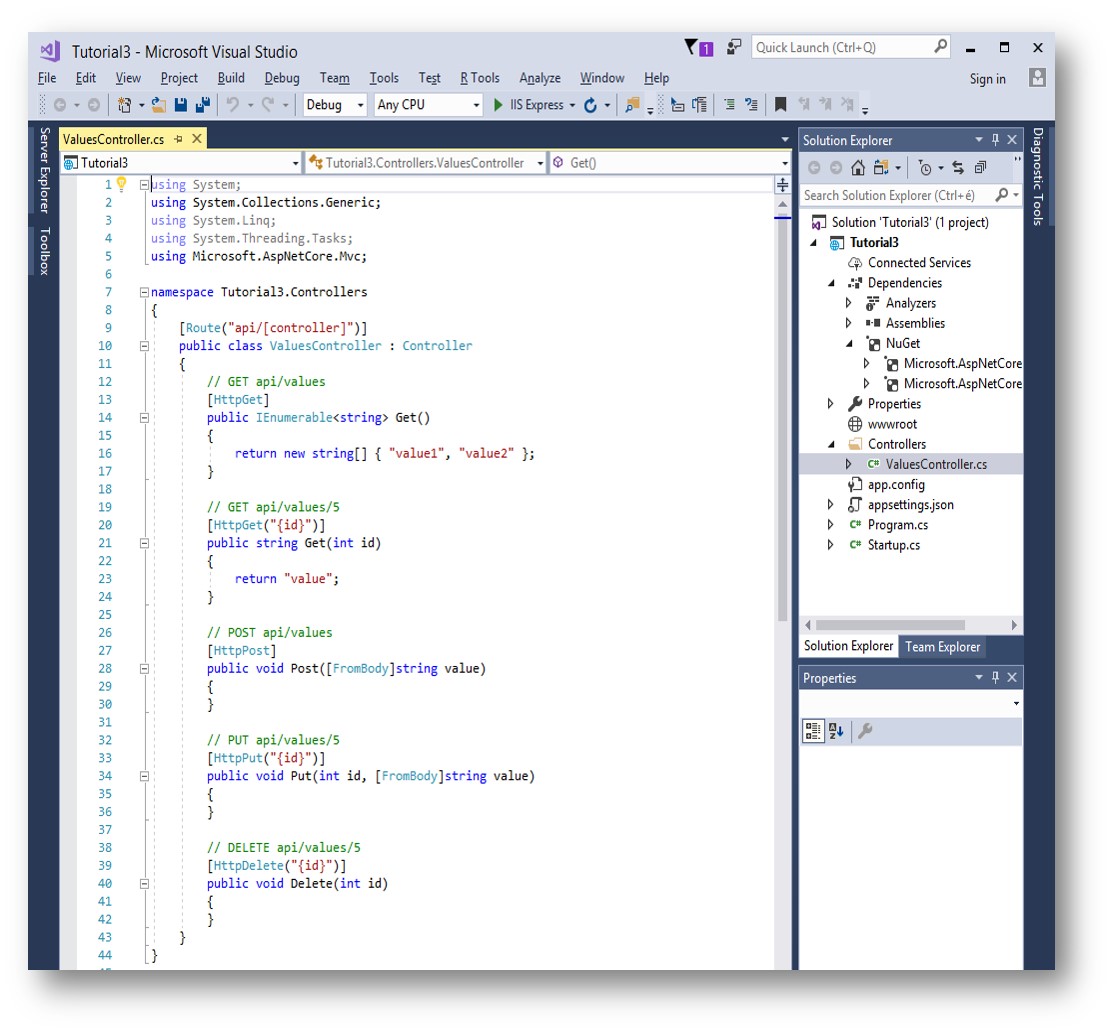
Now, Run the application and see that the output depends on the first method in the ValuesController File as shown in Listing 1
The controller determines what happesn when a HTTP request is made to the API
    [Route("api/[controller]")]
    public class ValuesController : Controller
    {
        // GET api/values
        [HttpGet]
        public IEnumerable<string> Get()
        {
            return new string[] { "value1", "value2" };
        }
Listing 1: Default Controller file
3. Understanding the Controller File in WEB API Application
The class is annotated with the Route annotation which comes befor the name of the class
The Route annotation specifies the URL strucuture of the class. In this case the path is given by
This is what comes after the base url. So if the base URL is is
Then the url to type to get to this controller would be:
Now inside the controller file, a decision is made on what method is to be executed.
In the case of the ValuesController, we have one method called Get(), which is annotated with
[HttpGet]
This means that a GET request to this controller would execute this method.
However if there are more than one methods annotated with the [HttpGet] annotation, then an error would be generated.
To solve this problem, we need to modify the Route annotation of this controller to also contain the name of the method.
So we would write it as:
api/[controller]/[action]
So in this case, to execute the Get() method, the Request URL and path would be something like:
http://localhost:8000/api/Values/Get
REST API also supports function overloading. So we can have another Get() method in this controller, but it must have a different signature (maybe would take a parameter)
4. Create the Employee Model
You already know that a model is simply a class used to define objects in our API application. To create the Employee model:
- Right-click on your project in the solution explorer and add a new Folder
- Name it Models
- Create a class inside this folder, name the file Employee. This is our employee model(you already know how to do this from Tutorial 1)
- Create the employee class using the following code in Listing 2:
namespace Tutorial3.Models
{
    public class Employee
    {
        public int Id { get; set; }
        public string Firsname { get; set; }
        public string Lastname { get; set; }
        public string Nationality { get; set; }
        public string Phone { get; set; }
        public double Score { get; set; }
    }
}
Listing 2: Employee Model/Class
5. Create the Employee Controller
Follow the steps below to add a new controller to the API
- Right-click on the Controller folder and Choose Add, then choose Controller
- In the New Controller Wizard, Select Empty API Controller
- A new controller will be added.
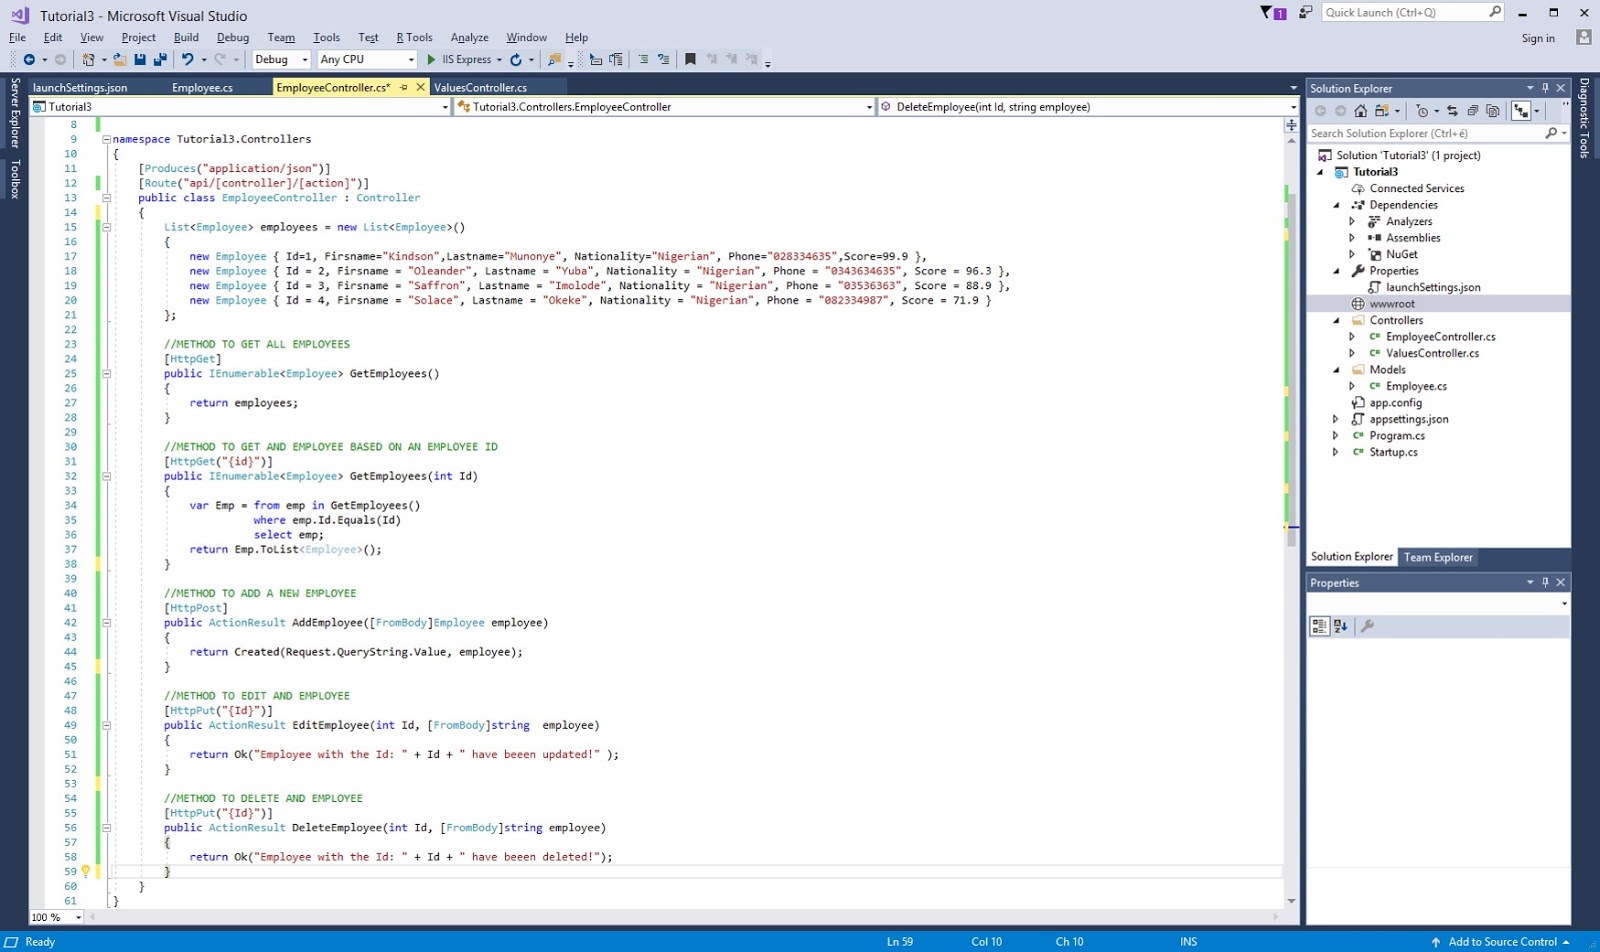
- Open it and ensure that the content is as shown in Figure 5
Now we would add all our methods (methods are known as actions in a REST API)
6. Create up the GET Methods
Pay attention to this section. In Tutorial 1, we wrote two methods
- GetEmployees() and
- GetEmployeesByID()
But using GetEmployeeByID does not well conform to the RESTful style of resource-based URIs.
So in this case we would write the the second method also as GetEmployees but we would make is take a parameter with would be the Id of the employee.
Clear enough? Sure!
The code for the GetEmployees method is given in Listing 3. This method returns all the employees
Copy and paste this code in your EmployeeController file
        //METHOD TO GET ALL EMPLOYEES
        [HttpGet]
        public IEnumerable<Employee> GetEmployees()
        {
            return employees;
        }
Listing 3: GetEmployees() Method to return all Employees
Now the next code below is the GetEmployees method that takes a parameter the Id of the employee to be returned.
Notice two things:
- the Id parameter is specified as part of the HttpGet annotation
- the Id parameter is also specified as a parameter to the GetEmployees method
this differentiates it from the previous GetEmployees() method
        //METHOD TO GET AND EMPLOYEE BASED ON AN EMPLOYEE ID
        [HttpGet("{id}")]
        public IEnumerable<Employee> GetEmployees(int Id)
        {
            var Emp = from emp in GetEmployees()
                      where emp.Id.Equals(Id)
                      select emp;
            return Emp.ToList<Employee>();
        }
Listing 4 : GetEmployees() method based on input id
7. Set up the POST method
The POST method is used in an API to create a new resource.
In this case, the POST method is AddEmployee and it is supposed to create a new employee.
Here the method is AddEmployee as defined in Listing 5 and it take no parameter.
Copy and paste this code in your EmployeeController file
Note: We have not implemented a method to insert a new Employee to any database. In the next Tutorial we would actually write the code to handle data storage. But we have written it in such a way that it would run successfully and return the correct status code.
Also note that the employee parameter is given annotation [FromBody] which means that the modified data is coming from the body of the REST request.
        //METHOD TO ADD A NEW EMPLOYEE
        [HttpPost]
        public ActionResult AddEmployee([FromBody]Employee employee)
        {
            return Created(Request.QueryString.Value, employee);
        }
Listing 5: The AddEmployee POST method
8. Write the PUT and DELETE method
The PUT method is used to modify an existing resource.
Here we have named our PUT method as EditEmployee()
Notice that the PUT method takes two parameters:
Id, which represents the Id of the Employee to be edited.
Employee object containing the modified data to be used to update the record
Also note that the employee parameter is given annotation [FromBody] which means that the modified data is coming from the body of the REST request. (this is explained in Tutorial 4)
We would cover the concept of header and body in Tutorial 4, when we would test this REST API with the POST and PUT operations.
The DELETE method is similar to the PUT method except that:
the DELETE method takes only one parameter
the DELETE method deletes an Employee record
the DELETE method is annotated with the HttpDelete annotation
        //METHOD TO EDIT AND EMPLOYEE
        [HttpPut("{Id}")]
        public ActionResult EditEmployee(int Id, [FromBody]string  employee)
        {
            return Ok("Employee with the Id: " + Id + " have beeen updated!" );
        }


        //METHOD TO DELETE AND EMPLOYEE
        [HttpDelete("{Id}")]
        public ActionResult DeleteEmployee(int Id, [FromBody]string employee)
        {
            return Ok("Employee with the Id: " + Id + " have beeen deleted!");
        }
Listing 6: The PUT and DELETE methods
Now copy and paste the PUT and DELETE codes into the EmployeeController file
The final result of the EmployeeController file is given in Figure 6
Note: You may not have written the first part of the code, where I created 4 different employees manually. Since is did not provide this code. So go ahead and type it yourself
If you have come this far, congratulation!! You have done noble! 😄😄😄
But it is not yet over.
You could go ahead to run the program but at this point. We need to do more to test this program than just runing it. So read the Next Steps section.
9. Next Steps
Congratulations again for coming this far! 😃😃😃
Since you need to learn how to use a REST Client application (ARC in this case, from Tutorial 1) to test REST APIs, you need to learn how to test all the operations GET, POST, PUT, DELETE.
In Tutorial 4, you will learn how to specify the input values for creating a new record. You will also learn how to speficy the content type, the header, body and other parameters
For now thanks you for reading!
Do leave a comment below if this have been informative for you.

