 by
by This is Part 2 of the Java calculator NetBeans tutorial. You will improve the calculator from Part 1 by fixing button layout, supporting multi-digit numbers, adding the +/- toggle, and handling common input errors.
Prerequisites: Complete Part 1 — Build a Simple Calculator in Java Using NetBeans with a working CalculatorProgram project and pnlCalculator form. Estimated time: 45–60 minutes.

Questions Answered in Part 2
Readers of Part 1 asked:
- How do I arrange the buttons neatly on the form?
- How do I handle numbers greater than 9 (multi-digit input)?
- What is the code for the +/- button?
- How do I handle wrong or invalid input?
This tutorial addresses all four. (An earlier draft mentioned a Part 3; those topics are covered here instead.)
Step 1–3: Arrange Buttons with Absolute Layout
Step 1: Switch to Absolute Layout
Right-click inside the panel that holds the buttons → Set Layout → Absolute Layout. Buttons will no longer snap to a grid, so you can position them precisely.

Step 2: Resize and align buttons
Drag each button into a clean grid. Aim for even spacing between rows and columns.
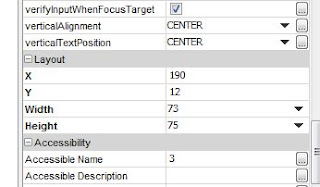
Step 3 (optional): Uniform dimensions via Properties
Select a button and open the Properties window → Layout section:
- Give every button the same width and height (except = if you want it taller)
- Buttons in the same row share the same Y coordinate
- Buttons in the same column share the same X coordinate
Step 4–5: Handle Multi-digit Numbers
Replace the Part 1 click handlers for digits 0–9 with the pattern below. It appends digits before an operator is chosen, and builds value2 digit-by-digit after an operator appears in the display.
Example: Button 1 (btn1)
String res = txtResult.getText();
if (res.isEmpty()) {
    txtResult.setText("1");
} else if (res.contains("+") || res.contains("-") || res.contains("*") || res.contains("/")) {
    txtResult.setText(res + "1");
    value2 = Integer.parseInt(value2 + "1");
} else {
    txtResult.setText(res + "1");
}
Repeat for buttons 2–9 and 0
Copy the pattern, changing "1" and value2 + "1" to the matching digit. For example, button 7:
String res = txtResult.getText();
if (res.isEmpty()) {
    txtResult.setText("7");
} else if (res.contains("+") || res.contains("-") || res.contains("*") || res.contains("/")) {
    txtResult.setText(res + "7");
    value2 = Integer.parseInt(value2 + "7");
} else {
    txtResult.setText(res + "7");
}
How it works: Before an operator, digits concatenate in the display (e.g. 1 then 2 → 12). After an operator, value2 is built by string concatenation on the integer (value2 + "7" converts to string, then parseInt).
Step 6: Update Operator Buttons (+, −, ×, ÷)
Replace the Part 1 operator handlers so value1 is parsed from the full display text (multi-digit) before the operator symbol is appended.
Important: Use btnDivision (the name from Part 1), not btnDivide.
// btnPlus
if (txtResult.getText().isEmpty()) return;
value1 = Integer.parseInt(txtResult.getText().trim());
txtResult.setText(txtResult.getText() + " " + btnPlus.getText());
operator = "plus";

// btnMinus
if (txtResult.getText().isEmpty()) return;
value1 = Integer.parseInt(txtResult.getText().trim());
txtResult.setText(txtResult.getText() + " " + btnMinus.getText());
operator = "minus";

// btnDivision
if (txtResult.getText().isEmpty()) return;
value1 = Integer.parseInt(txtResult.getText().trim());
txtResult.setText(txtResult.getText() + " " + btnDivision.getText());
operator = "division";

// btnMultiplication
if (txtResult.getText().isEmpty()) return;
value1 = Integer.parseInt(txtResult.getText().trim());
txtResult.setText(txtResult.getText() + " " + btnMultiplication.getText());
operator = "multiplication";
Division fix: If division returned wrong results in Part 1, confirm the button variable is btnDivision and that operator is set to "division" (compared with .equals() in the equals handler).
Step 7: +/- (Plus-Minus) Button
Add a mouseClicked handler for btnPlusMinus that toggles the sign of the number currently displayed:
String text = txtResult.getText().trim();
if (text.isEmpty()) return;
try {
    double num = Double.parseDouble(text);
    num = -num;
    txtResult.setText(String.valueOf((int) num));
} catch (NumberFormatException ex) {
    txtResult.setText("Invalid input");
}
This flips positive ↔ negative on the current value (e.g. 42 → -42). For decimal support, remove the (int) cast and keep Double.toString(num).
Step 8: Update the Equals Button
Replace the Part 1 equals handler with a version that handles division-by-zero and uses .equals() for string comparison:
double answer = 0;
if ("plus".equals(operator))
    answer = value1 + value2;
else if ("minus".equals(operator))
    answer = value1 - value2;
else if ("multiplication".equals(operator))
    answer = value1 * value2;
else if ("division".equals(operator)) {
    if (value2 == 0) {
        txtResult.setText("Cannot divide by zero");
        return;
    }
    answer = (double) value1 / value2;
}
else {
    txtResult.setText("No operator selected");
    return;
}
txtResult.setText(Double.toString(answer));
Step 9: Basic Error Handling
Add validation for common mistakes:
| Error | Handler |
|---|---|
| Divide by zero | Show Cannot divide by zero (equals handler above) |
| No operator before = | Show No operator selected |
| Invalid number on +/- | catch NumberFormatException → Invalid input |
| Wrong operator entered | Wrap parseInt in try/catch on operator buttons: |
// Example on btnPlus — wrap parseInt
try {
    if (txtResult.getText().isEmpty()) return;
    value1 = Integer.parseInt(txtResult.getText().trim());
    txtResult.setText(txtResult.getText() + " " + btnPlus.getText());
    operator = "plus";
} catch (NumberFormatException ex) {
    txtResult.setText("You have entered a wrong operator.");
}
Step 10: Test Your Improved Calculator
Run the form and verify:
- Multi-digit:
12 + 34 =→46.0 - +/- toggle: Enter
5, click +/- →-5 - Division:
20 / 4 =→5.0 - Divide by zero:
8 / 0 =→ error message - Clear: CE resets the display
Frequently Asked Questions
What is the code for the +/- button?
See Step 7 above. It parses the display value, multiplies by −1, and writes it back to txtResult.
Why is division not working properly?
Check three things: (1) button variable is btnDivision, not btnDivide; (2) operator is "division"; (3) equals handler uses "division".equals(operator) and casts to double for non-integer results.
Is there a Part 3?
Decimal points and advanced validation were originally planned as Part 3. This updated Part 2 covers multi-digit input, +/-, and basic errors. For decimal support, change operand types from int to double and use Double.parseDouble() throughout.
When was Part 2 published?
The original Part 2 dates to 2017. This July 2026 revision adds missing +/- code, fixes the division button name, and documents error handling readers requested in comments.
Calculator Tutorial Series
- Part 1 — GUI design, buttons, and basic arithmetic
- Part 2 (this page) — layout, multi-digit, +/-, errors
- Lesson 3 — Structure of a Java Program
- 15 Easy Free Java Tutorials
Ready for structured Java training? Join Alkademy for instructor-led Java courses with hands-on GUI and OOP projects.
When are you going to publish part 3????
[…] Continue to Part II […]
What about the plus/minus sign?
Division operator is not working properly
INCREDIBOOOL!
Part 3?